
Happy quads, healthy knees
Leg tension can wreak havoc not only on your hips and knees, but also your lower back. Follow this simple sequence to improve strength, flexibility and the overall health of your knees and surrounding real estate.
Roll it out! Place 2 toted Yoga Tune Up® therapy balls in the center of your thigh (quadriceps). You can use any other grippy and pliable ball. Breathe and allow your leg to relax into the ball each time you exhale. Flex and extend your knee to create a stretch in the front of the thigh. Repeat 5-10 times slowly, and breathe. Move the ball uptown or downtown and repeat the sequence once more.
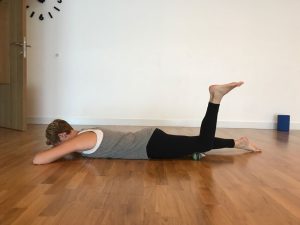
Quad tension quencher with Yoga Tune Up therapy balls
Stretch it out!
- Kneeling lunge at the wall: use a blanket or mat to pad your knee. Get your back knee as close to the wall as possible but as far away as you need to to maintain length in your spine. You should not feel any compression in your lower back. Stay one minute breathing, with a focus on a nice, long exhale. Switch sides. Repeat 2x.
- Seated quad stretch: a good modification for a milder stretch. Here Emilie is sitting on a block to avoid compressing her knees. If you do not have a block you can sit on a book or a firm pillow. This is a lovely position to work on some breathing strategies for relaxation. Stay here one minute counting the breath, inhaling for the count of 4 and exhaling for the count of 4.
- Standing quad stretch: this is a great option if kneeling doesn’t feel great on your knees. Bring your weight into one leg (be careful not to throw your hip out to the side – engage your glutes). Bend the opposite knee and grab a hold of your ankle (not your foot). Bring your knee forward and if possible in line with the standing leg’s knee. Remember to breathe and to keep length in your spine by lifting the contents of your abdomen towards the small of your back. Use the wall if you need to for balance.
-
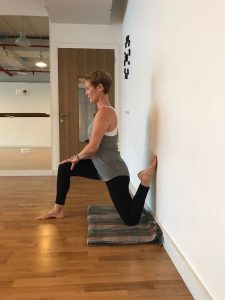
- kneeling low lunge
-
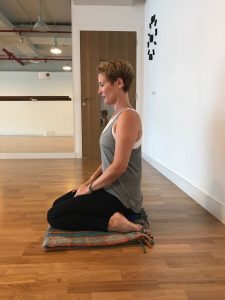
- seated quad stretch
-
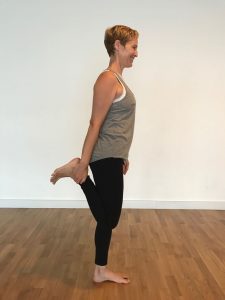
- standing quad stretch
Build strength!
- Bridge pose: a fantastic full-body integration exercise, we use Bridge pose in almost all our classes and sessions. Make sure you use your feet (keep pressing the inner heels down) and your arms. Here we are showing a version with the palms facing up – this can help to keep your chest from collapsing. The pose isn’t about you getting as high as you can (and compressing your back), it’s about find your maximum degree of hip extension (opening the hip crease) while keeping a long spine. Gently squeeze the block to switch on your inner thighs (adductors) and engage the glutes. As as we like to say, “your glutes are invited to this bridge party, but they’re not the guest of honour!” Breathe for 5 cycles and make sure your head feels light on the ground. Articulate your spine down slowly, one vertebra at a time until you are back down on the floor. You are in control, not gravity! 5x. On one (or more) of the reps, get a little big more bang for your buck by actively pulling your heels towards your buttocks once you’re in the position. Your feet won’t be going anywhere but you’ll say ‘hello’ to your hamstrings!
- Prone hamstring toner: lie down on your belly. You can use a towel or a pillow underneath your belly button (the pubic bone is down on the floor). This is a nice add-on to decompress the spine. Bend both knees as if trying to kick yourself in the butt and reach back with your arms. This is not about catching your ankles, it’s about reaching back with the arms to open the chest and finding the resilience of your hamstrings without help from your hands. Keep lengthening your tailbone towards your heels to avoid lower back compression and discomfort. 5 cycles of breath.
- Chair pose at the wall: stand at the wall, feet in front of you, spine neutral (your sacrum is on the wall, the lower back slightly bridges away from the wall, back ribs against the wall, neck slightly away, back of the head gently pushes into the wall with a slight chin tuck). Sit down as though sitting in a chair. Weight evenly distributed between the two feet, with slightly more emphasis in the heels. BREATHE. Arms are optional, but this is a great way to open the chest and front of the shoulders and unwind tension. Awareness of your glutes and hamstrings, push your feet into the floor. Stay here for as long as possible, aiming for 2 minutes. Block here is optional, you can use a book. Gently squeeze the block to find strength in your center from the inner thighs to the pelvic floor and torso.
- Standing leg raise: stand against the wall in a neutral spine position (same as chair pose). Lift your right leg up about 45 degrees (without shifting the position of your pelvis or spine) – lower the leg as much as you need to. Stay here for as long as you can breathe and remain soft inside. Good times!
-
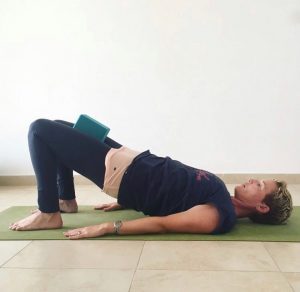
- bridge pose
-
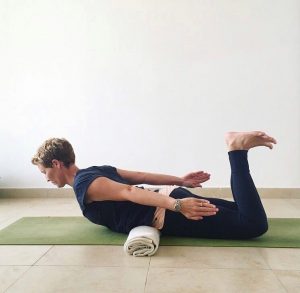
- prone hamstrings
-
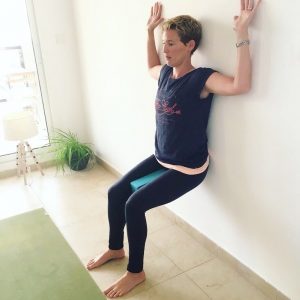
- chair pose
-
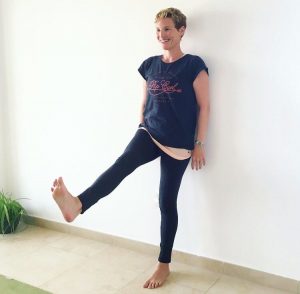
- standing leg raise
-
We hope you enjoyed this first sequence! Look out for a new sequence each week for you to try. We welcome feedback! If you’d like to address a pose, a part of the body or if you have a question, reach out to us in our contact form and we will answer! BREATHE. MOVE. FEEL.
No Comments
Sorry, the comment form is closed at this time.